
29 Nov How to Build the Best Photography Studio Setup
How to Build the Best Photography Studio Setup
Owning a photography studio can be pretty cost-saving in the long run.
It’s the best way to take your photography business to the next level.
Typically, every photographer is trying different ways to improve their businesses, attract more clients, and earn profits.
The only difference is how best can you create your photography studio set up by yourself, save money, and still beat your competitors.
In other words, it requires you to follow apt procedures and materials to make an outstanding photo studio.
Are you wondering how to do it yourself?
Whether you’re planning to shoot family, friends, or business photos, this ultimate guide will walk you through each step.
Without much ado, let’s learn how to build a photography studio setup.
1 – Decide on Location and Space

The first and critical thing to creating a photo studio is to decide the location where you’ll set it up.
Is it your basement, backyard, in a rental, or attic?
When choosing the area, be sure to consider one that gives you adequate room to fit your target customers and allow for future expansions.
You can use this as a reminder that you too can find a small studio space in a place you already own and has convinced you to take what you have and turn it into something great. – Savage Universal
It would be good to pick a space that can accommodate several people for portrait photos.
This can be best, especially if your target clients will be mainly families.
If not, it would be wiser to set your studio in a place where the space is relatively large.
By doing so, your studio will be incredibly flexible such that it will cater to the needs of your customers, whether in small or large numbers, satisfactorily.
Additionally, set your studio in a place where your customers can get parking space and motorway access.
On top of that, be sure the roads around you’re studio is not too tight for vehicles, whether small or larger coming to the studio.
More importantly, choose a highly secure location as this will help attract many clients to your photo studio and increase sales.
For business-oriented photographers, set your studio in the towns or close to cities where your customers can get easy access.
In this case, consider how much money you’ll spend to acquire the space and materials for the construction process.
However, if your studio requires a relatively larger space, finding someplace out of town and the city can help you save much money.
This means that your studio making process will be quite affordable.
Now that you have decided where you’ll be setting your photography studio let’s move to the next step.
2 – Set-Up backgrounds/backdrops
Photography backdrops are known to provide a contextual elegance to images.
They can also help control or regulate light reflections and exposure.
You can also use the proper light to populate the background to give your images a glamorous ambience.
If you want to get the best texture, colour temperature, and lighting, artificial screens can work as backdrops.
Moreover, today’s photography backgrounds are available in the market, with many of them made of paper, vinyl, or fabric.
White background product photography – Recall that nearly 90% of the top fashion sites use white background product photography. – Clipping Path
Fabric background choices to make include muslin, velvet, or canvas.

- 8.5 x 10 ft Backdrop Support System with 6 x 9 ft Muslin Backdrop(black, white green), Backdrop stand supports canvas, muslin and paper, suitable for home and professional studio use. the backdrop stand can extend to 8.5 ft in height and 10 ft wide lot’s of room for all kinds of studio shoots.
- 6 x 9 ft Muslin Backdrop(Black, White and Green), 100% Cotton Muslin seamless background to help absorb the light and eliminate reflection, thick and solid hang down feeling good. NOTE: due to transporting it, the backdrop may has wrinkles, please hung out the backdrop by 1-2 days if necessary, use steam iron to iron the reverse side.
- The Photography Umbrella Lighting Kit, soften Lighting and set up the light differently depending on what effect. Light stand and bulb holders are flexible, the height of light stand can be adjusted between 2.5ft- 7ft. The angle of the bulb holders can be turned both horizontally and vertically, manually adjust distance between light bulbs & umbrella to get best light
- 24″ x 24″ Softbox Continuous Lighting Kit, 5500K color temperature is most suitable for studio shooting, portrait lighting and still-photography, Ultimate soften light stream and remove shadow to make perfect shooting, Silver internal face can minimize light loss and maximize light spread.
- Package List, [2] 24″x24″ Softbox, [1] 8.5 x 10ft Backdrop Stand Support System,[3] 6×9 ft Muslin Backdrop(Black, White and Green), [6]Backdrop Spring Clamps, [4] Backdrop Clip Holder, [4] 5500K CFL Daylight Bulb,[2]Lamp Holder, [2] 33inch Translucent Umbrella, [4] 7ft Light Stand, [1] 43″ 5 in 1 Reflector. [1] Carrying Bag
As for printed canvas, they are the best for substituting the appearance of natural features, sky, or water.
You’ll need at least three backgrounds, mainly dark and white-coloured, to give your photos a vibrant and attractive look.
After that, you may go for backdrops with fancy and crisp patterns later on as your business progresses.
You can creatively use a curtain rod and hang your backdrops on the wall rather than buying a costly hanging kit.
So, you can alternate the background for your photos with ease and still get good images. But if you can afford it, then no problem.
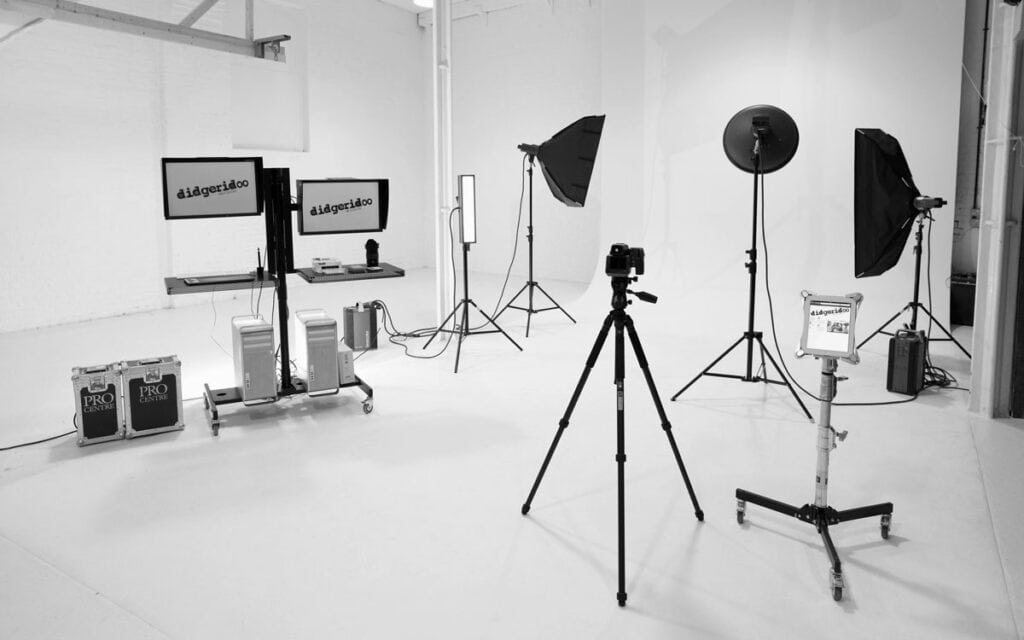
3 – Get suitable lighting equipment
Finding the right lighting equipment is massively essential when it comes to photography.
If you are a product photographer, capturing photos for jewellery, clothing, sporting accessories, or any other valuable product needs to capture the subject’s unique selling proposition.
Typically, the light source’s position can help create light and dark patches that provide vast power to a picture.
Besides, you can alter natural colours and moods to emphasise the subject’s features.
Take advantage of having your studio’s windows facing north and south by using natural sunlight.
Your photography studio gets better access to the sun the entire day to give you excellent light for your photography needs with this alignment.
However, daylight varies, and on cloudy days, you will have to use artificial sources of light.
A basic home photography studio lighting setup can consist of just one light (either a Speedlight or a flash), and a reflector, such as an umbrella. – Format
LED lamps

- PACKAGE INCLUDES: (2)USB LED Light Panel with USB Cable,(2)Tripod Stand, (2) Extension Rod Stick,(2)White Filter,(2)Red Filter,(2)Yellow Filter,(2)Blue Filter; Note:Using with laptops or power banks may draw too much power.And the USB port on most tablets does not generate enough power so please DO NOT use it with your Tablets.This light is designed to work with a Wall Plug, so it is recommended to use with a wall plug which is NOT Included in the package.Please purchase separately
- MULTIPLE-USE LED LIGHTING SET: The small LED panel light (5.51×3.714 inches/14× 9.5 centimeters) can be 180 degree adjustable, meeting your different demands on suitable shooting angle; Its brightness can be adjusted from 10% to 100%, and 66 Pieces energy-saving LED bulbs can provide superior lighting you need under different circumstances; Designed with convenient USB plug, you can plug it in your desktop PC, mobile power, charging plug or your USB socket at any time you want
- OPTIONAL SHOOTING EFFECT: Comes with 4 color filters (white, red, yellow and blue), they can provide softer and colorful lighting; You can change the color of the light through the 4 kind filters to create cool photos and videos (Note: Color filters need to be used with the white diffuser. Please insert the white diffuser firstly and put into another color filter)
- MULTI-USE TRIPOD STAND: The mini tripod (8.85 inches/22.5 centimeters) can be directly connected with the light panel to provide a ultra-low position lighting; It can also be connected with the 4-section extension stick with height ranging 20.27- 45.66 inches
- WIDE APPLICATION: It can be used as desktop lamp or floor lamp as you like. Suitable for living room, study room, baby room, bathroom, office, studio, etc; Perfect for product portrait youtube video photography(NOTE: Carrying bag is not included)
As much as soft natural light is excellent for outdoor shooting, your studio photos won’t survive without a steady source of artificial light.
With modern LED lamps, you can get reliable continuous, and consistent light.
You can obtain a striking array of colours by combining these lamps with colour filters and lighting strips.
This artificial source of light is excellent for tabletop photo shooting, like photographing food and still objects.
Speedlights

- Vertical Rotation Angle: 0~90 degrees, Horizontal Rotation Angle: 0~270 degrees; Note: Don’t support TTL and the camera menu setting Function
- Compatible with for Canon Nikon Panasonic Olympus Pentax Fijifilm and Sony with Mi Hot Shoe cameras,like a9 a7 a7II a7III a7R III a7RII a7SII a6000 a6300 a6500 (NOT compatible with Canon EOS Rebel SL3/250D,Rebel T7/1500D 2000D,Rebel T100/3000D 4000D)
- Power Management: Switch to the ON, the flash will start charging (the charging indicator is dim)
- For a test flash, press the test button. After use, press the ON/OFF to OFF to power off.
- Red charging indicator lamp flickers in every 1s; it indicates low battery; The flash unit has 8 steps of power output control which indicated by 8 pieces of LED
You may require Speedlights or strobe lights for use during flash photography.
These artificial lights create brief, cheerful flashes that bestow your subject with utmost character.
Other than that, they help in blocking the sun and creates powerful deep shadows.
If you are a novice photographer, you can get yourself an excellent Speedlight kit that comes with a studio softbox, translucent white umbrella, flash, and wireless trigger.
Modifiers
These are equipment that helps to control the direction and spread of light before illuminating your subject.
Modifiers deliver hard shadows that give dissonant contrast to your photos, and that’s why they serve to diffuse bright lights in a photography session.
You will find modifiers in three varieties that include umbrellas, softboxes, and scrims. They come in different forms and styles to differently.
Light modifier options include: Metallic or white reflects: Create the effect of having a whole other light on your scene; they will give you either a cool glow or, in the case of gold reflectors, a warm glow that could easily trick the eye into thinking it’s sunlight. – Format
Typically, artificial lighting helps supplement the light available in the photo studio and enhances the appearance of your images.
Therefore, you need to find a proper lighting kit to make clear and incredible pictures.
In that case, bright, white light can be the best lighting equipment to start with and capture excellent photos.
Find an ideal place in the studio and position your artificial light source aptly to make your subjects visible.
This will help you reflect, highlight, or assume distinct preplanned spots during photo shooting.
Besides, use light reflectors or modifiers to give incredible effects to your photos.
4 – Purchase the perfect camera gear
Finding a good camera with handy features is essential for capturing excellent images that your customers will love.
Some people may even spend up to $5000 for the perfect camera.
It may be costly, yes, but usually worth it.
In other words, such a camera gives excellent shots and will last for many years.
You may also use a smartphone with powerful camera lenses and still get incredible images.
What’s more, no one would want blurry or shaky images, whether it’s a brand new camera or not.
A tripod stand may be handy for getting steady and crystal clear images.
The most significant advantage is that they allow for easy modifications to suit your height and angle needs.

- 𝗦𝘁𝗿𝗼𝗻𝗴, 𝗟𝗶𝗴𝗵𝘁𝘄𝗲𝗶𝗴𝗵𝘁 & 𝗗𝘂𝗿𝗮𝗯𝗹𝗲 – The Apex A70 Camera and Phone Tripod was designed for adventure. Made of high strength Aluminum for superior durability, while also being lightweight (less than 4lbs) for easy travel and adventure. No more lugging around heavy gear!
- 𝗕𝘂𝗶𝗹𝘁-𝗜𝗻 𝗠𝗼𝗻𝗼𝗽𝗼𝗱 – Sometimes you need more mobility. That’s why the Apex A70 tripod for phone & camera features a built in monopod. Simply remove the center column and expand it up 65”. Whether you’re shooting wildlife or sports, it’s the perfect monopod for camera and phones!
- 𝗕𝗼𝗻𝘂𝘀 𝗚𝗲𝗮𝗿 – To make the Apex A70 iPhone Tripod even better, it also comes with bonus items including; 2x base plates, UniMount 360 phone tripod mount (fits ANY size phone even with a case), QuikPic Bluetooth Remote Shutter and travel tripod bag!
- 𝗤𝘂𝗶𝗸𝗖𝗹𝗶𝗽 𝗔𝗱𝗷𝘂𝘀𝘁𝗶𝗻𝗴 – Quickly expand the Apex A70 Camera Tripod up to 70 inches using the QuikClip design & take shots like a PRO! When you’re done, easily compact it down and place it in the travel bag for easy portability. The perfect travel tripod for phone and camera!
- 𝟭𝟬𝟬% 𝗚𝘂𝗮𝗿𝗮𝗻𝘁𝗲𝗲– Only KobraTech offers a full 60 day 100% money back guarantee + 1 year warranty so you can buy the Apex A70 Tripod for camera & phone with confidence!
5 – Interior Designs
The way you design and decorate your studio’s interiors is another critical thing.
It determines the appearance of your final images, impression, and generally the levels of comfort it will give your clients.
Most people like sitting on a stool or a chair when taking their photos.
Others love holding certain items made to look like animals or other stuff.
These make them look even more stylish and get impressive images.
These items will vary depending on the type or nature of your photography business.
For instance, if you intend to specialise in capturing portraits, you may need things like furniture, toys, magazines, a filing cabinet for prints, a backdrop screen, and a work desk.
The first three add-ons can help give your customers a good impression and attractive images.
Besides, they may help in building an excellent ambience for word-of-mouth ideal for your photography portfolio.
What if you are a food photographer?
If that is the case, you may require a table and chairs alongside the kitchen area and kitchenware if need be.
Product photographers need kick-snacks and souvenirs to function as photography props.
When it comes to colours for the studio’s interior walls, go for one that supports the type of effects you prefer for your camera.
If you want a more excellent light reflection and limit shadows, consider soft colours like white.
Matte finishes are the best for controlling glare than the glossy ones.
Ensure the studio’s flooring is smooth marble or wood, as you will have to move stands around more often.
Besides, such a flooring system tends to be elegant, just like your dream photography studio.
More importantly, ensure the studio has no empty spaces or walls as you can sell what you show your clients.
So, consider adding or filling the waiting areas with printed samples of your great work.
And always create an inventory to get everything in order.
6 – Determine your editing means

Photography is not just taking images, and that’s all, no!
It involves editing the captured pictures and retouching them to perfection to remove any flaws.
Before starting the editing process, you need to go through all the images you have captured, select the best ones, and arrange them in proper order.
By doing so, you will save much time and reduce the stress or costs you would spend on pictures that may never be useful.
However, it is essential to understand how you will be editing your captured images.
Are you going to edit the captured photos by yourself?
If so, a laptop or desktop with apt editing software is what you must have.
Understand which photo editing software is ideal for your needs.
Some are available for use freely, and others require payments before using them.
Consider selecting the best software that allows for easy use to save you a lot of time and effort during the editing process.
You can also find all your photos edited and retouched to perfection by professionals at FixiPixi at an incredibly affordable cost.
They are reliable, efficient, and guarantee you the best quality photos your customers will love.
7 – Find a suitable photo printer

- Maximum 4800×2400 dpi FINE printhead technology
- Photo Lab quality 11-inchx14-inch color photo in approximately 1 minute 23 seconds
- Support for fine art paper up to 13″x19″ with two separate paper paths, including front feeder for heavy-weight paper types
- Professional printer features using Easy-PhotoPrint Pro plug-in software
- Ambient Light Correction feature; optimizes color output to match the specified lighting condition
Most of your customers will ask for hard copies, especially those for the group, friends, pets, and family photos.
They will need them to place somewhere on the walls of their homes or offices or put them in their photo albums.
As such, a printer will be mandatory for your photography studio.
Even businesses will, at some point, need photos in hard copies for different uses.
So, find one whose performance is reliable, faster, and efficient.
8 – Market your new photography studio
Once you have everything set, it is time to get your photography studio recognised.
How are you going to do that?
Well, it is straightforward.
Design and print several posters or cards and pass them to social gatherings.
You can share them also with family members and friends and ask them to share with other individuals.
Similarly, share the posters or some of your work on social media platforms like Facebook, Twitter, Instagram, and much more.
By doing so, you will be making your studio recognised and, in turn, attract customers.
Important Note
Creating the best photography studio is a step by step process that every photography enthusiast need to handle with care.
The final results depend mostly on your inputs and understanding.
Therefore, always have a working plan before doing anything.
Keep it simple, and don’t try to overdo the studio making process as it may make things harder for you and even fail to meet your expectations.
Conclusion
Building a photography studio is not a tricky task.
All you need is to create a suitable plan and execute it as required.
By so, we mean you’ll need to spend some money to make the process successful.
If correctly done, the benefits that the studio will give you are plenty.
If you get lost somewhere, be sure to go through the steps above to get everything right.
Best of luck with your photo studio creation!
Last update on 2020-11-29 / Affiliate links / Images from Amazon Product Advertising API
